Hush
Hush is a macOS app that protects privacy during screen sharing by blurring or hiding desktop content in video calls.
What is Hush?
Hush is a macOS app that protects privacy during screen sharing by blurring or hiding parts of your desktop. It’s designed to help you keep sensitive content out of view in video calls such as Zoom and Google Meet.
The core purpose of Hush is to control what your audience can see while you present—without changing where your apps are located—using either a full desktop overlay mode or an app-focused blur mode.
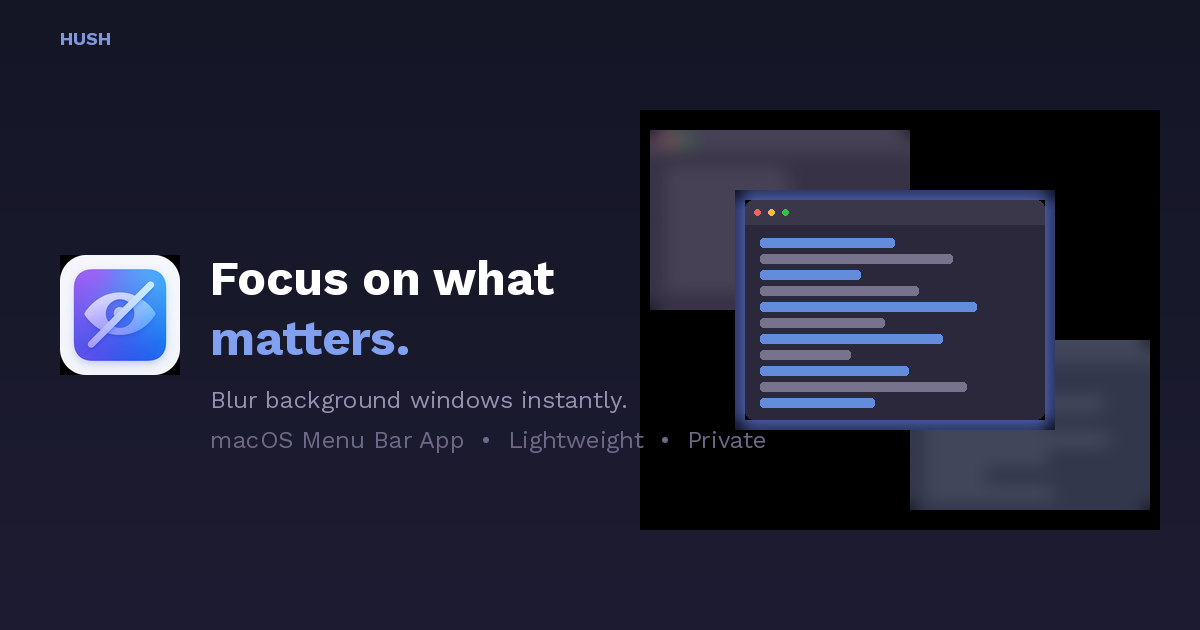
Key Features
- Desktop Mode with overlay: Your wallpaper, icons, and widgets disappear behind a clean overlay while app windows remain in their original positions and stay fully visible.
- Safari/Active Window Focus Mode: Everything blurs except the window you’re using; the focus follows your active window as you switch apps (including via ⌘Tab).
- Selected apps and dock blur controls: You can set focus/blur behavior for selected apps, blur the dock, and include notes and mail alongside the focus behavior.
- Global hotkey (⌘⇧H): Press the hotkey from any app to hide your desktop clutter. Hush can also auto-activate when screen sharing starts.
- Custom overlays and blur intensity: Use frosted blur, solid colors, or a custom image, with 8 blur intensity levels.
- Multi-display per-screen control: Apply controls independently per display, and handle hot-plugging monitors while presenting.
- Prevent Sleep during presentations: Keeps the display awake during screen sharing/presenting to avoid dimming interruptions.
- Lightweight menu bar app: Runs as a menu bar app without a dock icon; described as ~5K lines of Swift with zero dependencies.
- Localized interface: Localized from English to Ukrainian, Japanese, and other languages (24 languages total).
- Offline and on-device privacy controls: Listed as 100% offline, 0 tracking, and 100% on-device.
How to Use Hush
- Install Hush from the Mac App Store (listed as a ~5MB download).
- Choose how you want it to behave (Desktop Mode or Focus Mode).
- Activate it using the global hotkey ⌘⇧H, or enable auto-activation when screen sharing starts.
- Begin your screen share. Hush applies the selected overlay/blur behavior so only the intended window(s) or desktop view are visible.
Use Cases
- Remote work screen shares with private files: When presenting work content, blur or hide non-relevant windows so messages and documents don’t appear unintentionally.
- Developer demos in an active editor: Use Focus Mode so a code editor window remains clear while other windows are blurred as you move between tools.
- Presentations without desktop distractions: In Desktop Mode, hide wallpaper/icons/widgets behind a clean overlay while keeping app windows visible and stable.
- Multi-monitor presentations: Control blur behavior per display during demos that involve multiple monitors, including scenarios where monitors are connected or reconnected.
- Long meetings where the screen shouldn’t dim: Present with sleep prevention to reduce interruptions from display dimming.
FAQ
-
Does Hush capture my screen recording? Hush is described as 100% offline and sandboxed. Screen Recording permission is described as being used only in Focus Mode to read window positions; it “never captures screen content.”
-
How do I turn Hush on during a call? Use the global hotkey ⌘⇧H, or set it to auto-activate when screen sharing starts.
-
What’s the difference between Desktop Mode and Focus Mode? Desktop Mode hides the wallpaper/icons/widgets behind an overlay while keeping app windows visible. Focus Mode blurs everything except the active window.
-
Can Hush be configured for multiple monitors? Yes. It supports multi-display control with per-screen behavior and can handle hot-plugging monitors.
-
Is Hush available only on macOS? The page describes installation via the Mac App Store and references macOS app features (menu bar app, keyboard shortcut), indicating it’s for macOS.
Alternatives
- Built-in window/share options in video conferencing apps: Instead of blurring, some tools let you share a single window or tab. This changes what gets shared rather than adding a blur overlay.
- Privacy/blur overlays from screen sharing companion utilities: Some apps focus on hiding or masking content during capture. Compared with Hush, workflows may differ (e.g., whether they rely on screen sharing permissions or per-window selection).
- OS-level focus modes and display controls: macOS focus or display management can reduce what’s shown, but typically doesn’t provide the same per-window blur behavior tailored to screen sharing.
- Presentation software that uses pre-built capture scenes: Tools that prepare “scenes” or recording layouts can help avoid accidental exposure, but may require more upfront setup than a hotkey/auto-detect approach.
Alternatives
Deskboard
Deskboard turns folders into visual workspaces, letting you arrange files freely, add widgets, annotate content, and stay synced with actual files.
ReactVision Studio
ReactVision Studio is a browser-based AR and VR editor for building scenes visually and shipping natively to iOS, Android, and Meta Quest via React Native and ViroReact.
Shadow
Shadow is a Mac app that captures what you see, hear, and say, then runs custom Skills on that context for notes, replies, and summaries.
Montage
Montage is an agentic UI rendering platform for rich, interactive AI interface components, with a single SDK and support for any underlying model.
SearchAd AI
SearchAd AI is a chat-based tool for planning Apple Search Ads campaigns with country-specific keywords and budgets, requiring approval before launch.
Origio
Origio is a country and city comparison tool for moving or working abroad, personalized by your job and passport. Compare salaries, visas, cost of living, and quality of life.